Thursday, February 28, 2013

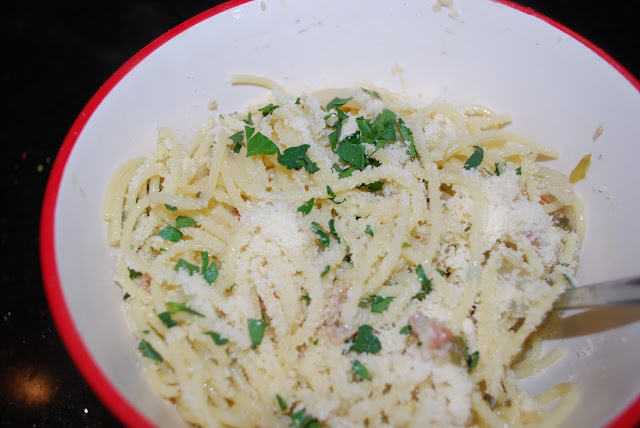
Spicy Spaghetti with Fennel, Pancetta & Romano Cheese

Hey Blogstalkers!

It's been quite a while since I posted a new recipe and so today I wanted to share one of my absolute favorites with you.  A somewhat-spicy, garlicky pasta with fennel and crispy pancetta.

This recipe is adapted from the January 2010 Bon Appetit magazine, which I have had a subscription to since college.  Not that I ever attempted any of the recipes back then but I would rather look at pictures of food than celebrities pumping gas (they're just like us!) any day and I loved to stare at the glossy pages and dream of the day I would have things like a stove and pans of my own.

The first time I made this recipe was with my (very literally) little sister Nicky.  She is like a very tiny version of me with much better style.  This is her with Ryan.  She is wearing like four inch heels in this picture.


Anyway, Ryan was working nights and Nicky had come to keep me company one random Tuesday and we felt like cooking.  Since Ryan wasn't home it was one of the rare occasions I could make a dish that was (almost) meatless, so Nicky and I perused the pages of all of my magazines and finally decided on this recipe.

Neither of us had ever cooked with fennel before and so the black licorice smell was off-putting and we were positive the dish would be a flop.  We reluctantly completed it and tasted the results and were floored.  It was SO delicious.  Subtly spicy and cheesy, the salt from the pancetta and the sweetness of the fennel perfectly offsetting each other.  It was instantly one of both of our favorite dishes.

Since then I have made the dish again and again.  It's actually the ONLY mostly-meatless dish Ryan tolerates for dinner.  He doesn't even ask me to make him a piece of chicken or something on the side!

I hope you all enjoy it as much as we do!


Spicy spaghetti with Fennel, Pancetta & Romano cheese

**Adapted from a recipe from the January 2010 edition of Bon Appetit Magazine**


Ingredients

3 oz Pancetta, chopped

3 TBS Extra Virgin Olive Oil, divided

4 Garlic Cloves, minced

(heaping) 1/4 c. chopped Jalapeños

2 large Fennel Bulbs, sliced vertically

1 1/2 c. low-sodium Chicken Broth

4 TBS flat leaf Parsley, divided

2 TBS Lemon juice

1 1/2 tsp Fennel Seeds, crushed (I just put them on a cutting board and press down on them with the textured side of my meat mallet.  You'll smell when they're crushed.)

1 lb Spaghetti

1 1/2 c. grated Romano Cheese

Lemon wedges for garnish.


Here is everything before I got to knife-wielding.


And here are my stand-in helpers since Nicky was busy not wanting to drive to the city just for spaghetti LAUREN.


And here is my pretty mise en place.  Ooh la la.


 Directions

Saute pancetta in a skillet over medium heat until it is starting to crisp, careful not to burn it.  Remove pancetta from the skillet using a slotted spoon or spatula and place on a bed of paper towels.  Gently pat the top with another paper towel to remove some of the fat, but do not drain the pan.

Explain to your husband that Pancetta is Italian bacon but that you have no idea if that means the pigs were Italian or the butchers were Italian and that is a ridiculous question and get out of my kitchen.


 Add 1 TSP olive oil to the drippings in the pan, swirling to coat.  Add the garlic and jalapeños to the pan and saute for about 1 minute or until you can really smell the garlic.


Add the fennel to the pan and cook until it is starting to wilt and slightly darken in color, about 5-6 minutes.


Now add the chicken broth, 2 TBS of the parsley, the lemon juice and fennel seeds.  Bring to a boil then reduce heat and cover.  Cook about 20 more minutes until fennel is falling-apart-tender.


In the meantime, cook the pasta, reserving a big scoop full of the cooking liquid.

Return the fennel mixture to high heat (uncovered) and cook until almost all of the liquid is absorbed, about 4-5 minutes.  Add the spaghetti to the fennel.  Mix in the remaining 2 TBS of olive oil, 1/2 c. Romano cheese and pancetta.

If the mixture is too dry, add splashes of the reserved cooking liquid.


Garnish with the remaining parsley, cheese and if you desire (I always do), an extra lemon wedge or two.


Enjoy!


Tuesday, January 29, 2013

Salmon Burgers with Hoisin BBQ and Cabbage Slaw

Hey Blogstalkers, long time no see.

In the last couple of weeks I've been craving salmon like crazy.  My dilemma though, is that Ryan doesn't take kindly to a grilled piece of salmon for dinner.  He's not on a delicate lady diet LAUREN.

So I turned to my book of tricks.  Which has exactly two tricks in it: hide lady food in soup or hide lady food in a burger.  And since salmon soup wasn't exactly doing it for me and I wasn't certain Ryan would eat a pink soup anyway, a burger it was.

There are three components to this burger but each one is completed pretty quickly and I swear to you the end result is absolutely worth using three pans.  After eating these, sweet little salmon burgers swam through my dreams all night.


Salmon burger with hoisin bbq sauce, pickled ginger and Cabbage slaw

**Adapted From A Recipe From Bobby Flay's Burgers, Fries & Shakes**

Makes 2 Burgers


INGREDIENTS (Hoisin BBQ Sauce)

1 Tablespoon Canola Oil                      

1 Large Shallot *coarsely chopped*

1 Clove Garlic *coarsely chopped*        

1/4 cup Hoisin sauce

1 Tablespoon Ketchup                          

1 Tablespoon Honey

1 teaspoon Soy Sauce                          

1 teaspoon Fish Sauce

1 1/2 teaspoons Rice Wine Vinegar


 DIRECTIONS (Hoisin BBQ Sauce)

Heat tablespoon oil in a saucepan over medium heat.  Add the shallots and the garlic and cook until they begin to soften, about 2-3 minutes.


Throw the rest of the ingredients into the pan and cook until the sauce begins to thicken (I find about 8 minutes) stirring frequently.  Remove the pan from the heat and let the sauce cool.


INGREDIENTS (Salmon Burgers)

2x 6 ounce Fresh Salmon Fillets*      

1 Tablespoon Canola Oil

Salt and Black Pepper to taste           

2 Hamburger Buns

*When possible I try to get wild salmon rather than farmed salmon.  Farmed salmon contains more fat (and less of it is the good Omega 3 fat) and thus more calories and less protein.  Farmed salmon can also contain chemicals like antibiotics and pesticides and are usually dyed pink** with a chemical that is associated with retinal damage.  The bad news is that yes, wild salmon is harder to find and is more expensive, so from time to time when I have to, I use farmed.

**Wild salmon have a natural pink color because of their crustacean inclusive diet.


 DIRECTIONS (Salmon Burgers)

Chop the salmon in large chunks whilst singing "Le Poisson" from The Little Mermaid.


Les poissons, les poissons
How I love les poissons
Love to chop and to serve little fish
First I cut off their heads
Then I pull out their bones
Ah mes oui, savez toujours delice


Then I throw the chunks in my mini food processor and process briefly.  If you don't have a food processor just go at the fish with a sharp knife for a couple of minutes.  Some bigger chunks in the mixture are just fine.


Next gently form two 3/4 inch - 1 inch thick burgers.  Do not over-handle the fish, this can make the patties fall apart while cooking.  Then take the back of a spoon and make a depression in the center of each burger. (As burgers tend to puff up in the center while cooking, making a depression in the center allows the burgers to keep their shape instead of puffing up into meatball-ish patties.)


Cover the salmon and let it chill in the fridge for at least half an hour before cooking.

Use the time the salmon is chilling to make the cabbage slaw.

INGREDIENTS (Cabbage Slaw)

1 Tablespoon Canola Oil                                 

1/8 cup Pickled Ginger *thinly sliced*

1 clove Garlic *minced*                                 

2 cups Savoy (purple) Cabbage *shredded*

1 cup Napa (green) Cabbage *shredded*        

Salt and Pepper to taste

1/8 cup Rice Wine Vinegar                             

1 teaspoon Sesame Oil

1 1/2 Tablespoons Cilantro *chopped*

Pickled Ginger or, alternatively, Sushi Ginger can usually be found in the Asian foods section of most grocery stores.


DIRECTIONS (Cabbage Slaw)

Heat tablespoon oil in a large saute pan over high heat.  Add the ginger and garlic to the pan and cook about one minute, until soft and aromatic.  Add the cabbage to the pan and season sparingly with salt and pepper.  Cook, stirring rarely, about three minutes or until cabbage just begins to wilt.  Remove the pan from the heat and stir in the rest of the ingredients.  Taste and add more salt and pepper as needed.  Let sit at room temperature.


DIRECTIONS (Back to the Salmon Burgers)

Heat tablespoon oil in a grill pan (or a saute pan if you don't have a grill pan) over medium high heat.  Season both sides of burger with salt and pepper.  Add to the pan and cook about three minutes, flipping when the bottom is golden brown.

I like my buns lightly toasted so I throw them on the stove near a burner while the salmon cooks.


Brush the cooked side of the salmon with some of the BBQ sauce and continue cooking about three more minutes or until desired degree of doneness.


Now assemble the burgers like so: Bun Bottom, Burger, More Hoisin Sauce, Cabbage Slaw, Pickled Ginger as garnish, Bun Top.


These are seriously seriously one of my favorite burgers of ALL TIME.  The buns are slightly crispy, the cabbage still has a bit of a crunch and the hoisin sauce is sweet and tangy.  The ginger adds a vinegary kick.   All of this on top of the delicate and sweet salmon is insane.

God I love little fishies don't you?


Thursday, January 17, 2013

Lemon Zucchini Muffins with Lemon Glaze

Good Day Blogstalkers and WELCOME to my newest little project!

I've always loved spending time in the kitchen.  Kneading dough soothes me, beating an egg calms me and chopping onions...well that just sucks...I find it helps to first get really angry at the onion and then kill it with a knife while crying at the awfulness of it all.  And say things like "At least his death will not be in vain, he shall make my spaghetti sauce delicious."  And then point the knife at the other onions in the kitchen and say "You're next."

Let's move on shall we?  So yeah, I love to cook.  I love to bake.  I love to write.  (I also love to dance to hip hop music, but that's neither here nor there.)  So I thought, why not start a food blog?  So I did.  And I named it CookBooksy because my second favorite thing to read, after other books, is cookbooks.

So that's my spiel.  Let's get on with the first recipe.

Lemon Zucchini Muffins with Lemon Glaze

**Adapted From A Recipe From AllRecipes.com**

I'm terrible at eating breakfast.  Many days I don't put anything at all in my mouth until two or three in the afternoon.  So in an effort to entice myself to start breaking my fast more regularly I thought I would whip up some tasty muffins.  These turned out more like cupcakes than muffins and I was like...shit.  But THEN I was like, never mind, am brilliant because now I get to eat cupcakes for breakfast.  Plus these are like healthy cupcakes because they have zucchini in them.  And that is a green vegetable.  Let's get to it!

Lemon Zucchini Muffins Cupcakes with Lemon Glaze


INGREDIENTS

1 3/4 c. All Purpose Flour                    1 c. White Sugar *divided*

1 tsp. Baking Powder                           3/4 tsp. Baking Soda

1/2 tsp. Salt                                        1 Medium Zucchini *shredded*

8 oz. Lemon Greek Yogurt                    6 TBS. Butter *melted then cooled til just warm*

1 Egg *beaten*                                     1 TBS. plus 1/3 c. Lemon Juice *divided*

1 TBS. plus 2 tsp. Lemon Zest *divided*


Simple right?  Eleven ingredients. (Using the lemons for both juice and zest)  Oh wait...actually twelve ingredients.  I forgot to mention the secret ingredient, one pinch of grated Lauren.


Ouch.


DIRECTIONS

Preheat the over to 400 degrees Farenheit (200 degrees Celsius.)

In a large bowl combine the flour, 3/4 c. sugar, baking powder, baking soda and salt.  Make a well in the middle of the bowl.  In another bowl mix shredded zucchini, yogurt, butter, egg, 1 TBS. lemon juice and 1 TBS. lemon zest.  (Note: The original recipe suggests using regular yogurt but with baking I prefer greek yogurt.  For one, it is much less likely to curdle while baking.  Also, it contains less carbohydrates and sodium than regular yogurt and is much higher in protein which means it'll help keep you feeling full for longer.)

Spoon the liquid mixture into the well you've made in the flour mixture and stir slowly, incorporating the flour until only just combined and then STOP.  DO NOT OVERSTIR.  If the batter appears much thicker and lumpier than normal cupcake don't worry, this means you're doing everything right.  Good for you.


Either grease or line a muffin pan with paper cups.  Spoon the batter into the pan, filling the cups almost all the way up as this is a low-rise recipe.  (Note: Contrary to the world of fashion, in baking, low-rise does not mean an impressive muffin-top.)  

You should have enough batter to fill one normal 12-count muffin tin, maybe a little bit more.

   
Place the pan in the preheated oven and bake for about 16-18 minutes or until a toothpick inserted into the center of one of the muffins comes out clean.

While the muffins or cupcakes or whatever are baking combine 1/3 c. lemon juice, 2 tsp. lemon zest and 1/4 c. sugar in a small saucepan and heat over medium-high heat stirring frequently until the glaze starts to simmer.  Then stir constantly until all of the sugar is dissolved and the mixture seems to thicken just a bit, about 7-10 minutes.  Then cover and keep warm until the muffins are out of the oven. 


Using a toothpick, poke about 8-10 holes in the top of each muffin and then spoon about a tsp. of glaze onto the top of each.  Let all of the muffins except for one cool for 5-10 minutes in the tin before removing.

Eat the other muffin. (Can you tell that my liners have Tinker Bell all over them?  I wanted to make these very special because Ryan will be taking them to work for his breakfast.  Am VERY good wife.)


The warm muffin will have a very soft almost custard-like texture.  The glaze adds a kick of lemony wonderfulness to each bite.  SO good.  The completely cooled product will, as I said, have a more cupcake-like texture.  Still SO good.


Enjoy Blogstalkers!  What do you think of the new blog?